Modelling Notes:
Golden Arrow Productions G16 Class 4-8-0T Body Kit
by Graham R 'Muz' Muspratt
For information on the prototype please visit our G16 Class section. |
| The G16 is the latest in the range of resin body only kits from
Golden Arrow Productions and is designed to fit on a modified Hornby 8F chassis
(China version). This is somewhat of a compromise as the G16s had an evenly
spaced 5'1" driving wheels on 6' centres whereas the 8F has
4'8" drivers on unequal spacing. The kit correctly requires the
cylinders and valve gear to be relocated further forward and the cylinders
inclined. The main connecting rod is therefore relocated to be driven off the
second rather than the third axle, this in itself creates another compromise as
the large balance weight remaining on the third wheel set is incorrect and not
easily rectified (it is not possible to simply swap the second and third wheel
sets over as the chassis is driven via the third axle which therefore has the
driving gear mounted on it).
Golden Arrow Kit cast resin items as supplied:
Whilst the other Golden Arrow Productions kits I have built, namely a Bulleid Leader, W class 2-6-4T and Maunsell 350HP DE shunter, were without some of the finer detailing items such as additional bogie wheels, handrail knobs, pipe work and lamp irons, this kit leaves the greatest number of items to be additionally sourced by the purchaser for any kit I have bought to date. It comes without clack valves, injectors, smoke box door dart, whistle, rear bunker steps (odd seeing GAP provide the front footplate steps which are similar), vacuum pipes and even buffers! |
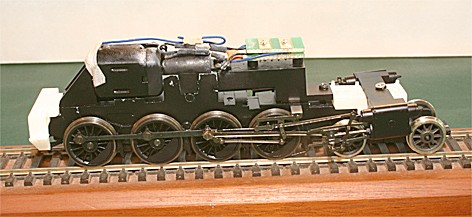 |
| Chassis modifications The Hornby chassis requires quite extensive modification. Firstly the chassis is dismantled, removing the second and third wheel sets and swapping the extended crank pins for the main connecting rod from the third axle to the second axle. As stated above, the wheels sets cannot simply be swapped over due to the drive gear being located on the third axle. The 8F style motion bracket is removed and discarded. The cylinder block requires the valve guide to be cut off and the block refitted onto the cast resin chassis extension piece, which also correctly inclines the cylinders. The slide bars, previously supported both at the cylinder block end and by the now discarded motion bracket, have to be super glued into the cylinder block ensuring they remain square and parallel. The metal valve gear cross piece requires to be slightly reshaped as it is now clamped in a new position under the chassis weight. The rear of the metal chassis block requires to be shortened using a hacksaw by 6mm. Relocating the con rod to operate off the second rather than the third axle means that the Hornby spacer washer that usually fits on the crank pin under between the main connecting rod and the side connecting rods now fouls on the rivet joining the side connecting rod pieces. The instructions suggest replacing the Hornby spacer with a washer (neither supplied nor the size specified). I found that the washers I had to hand caused the valve gear to lock, so I filed the end of the first section of the side connecting rod slightly to give clearance for continued use of the Hornby spacer. The motion bracket from the 8F is discarded, but no replacement of the correct style is included with the kit, so I fabricated one from plastic to suit. The 8F chassis has sand pipes to the front and third wheels, the G16 had sanding to the front and rear axles only, so I cut off the unwanted pipes and added pipes using brass wire to the sandboxes incorporated in the rear chassis mounting block. I also added guard irons from suitably shaped plastic strip and Injectors from Gibson castings, along with pipe work in copper to the rear chassis mounting block/sandboxes. The front bogie is simply held by a screw into a cast boss on the underside of the chassis extension piece, the instructions recommend using a small spring to assist with road holding. I used a small copper spring (from an old Mainline tension lock coupling) but then found that the boss needed to be filed back to allow the bogie to sit on the rails without lifting the front driving wheels off the track and also still allow the spring to work. Performance was also improved by the addition of lead weight to the bogie itself. |
 |
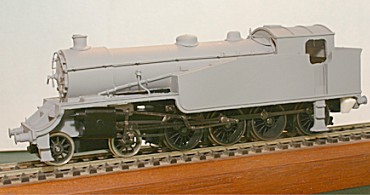 |
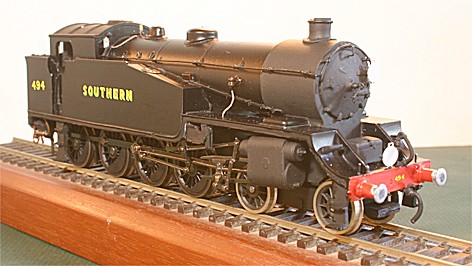
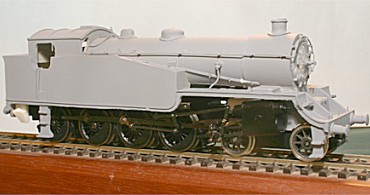
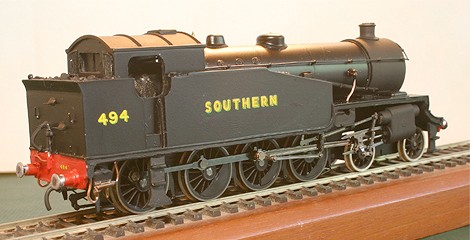
| Body My first impression of the body and other castings in this kit is that they appeared to be much crisper and sharper that the previous kits I have built from Golden Arrow. The components required very little cleaning up but care must be taken around the window openings, and the lower edge of the tank sides/running plates. For the detail items I used: Gibson turned brass handrail knobs; Craftsman white metal Drummond style buffers; brass clack valves, smoke box dart, etched rear spectacle protection bars and injectors from Mainly Trains; Craftsman Urie style whistle, various pieces of copper wire for pipe work, plastic section for the bunker rear steps and lamp irons from Bambi staples. I also added, using microstrip, the cover for the pipe runs from the lubricator reservoirs located just above the side tanks diagonally down the side of the boiler to the cylinders, I am surprised that this obvious feature is not part of the body casting especially as the reservoir is already moulded in position. I careful drilled out the inside of the chimney which is cast solid and added real steam coal to the bunker. Final painting was with Halford's Satin black aerosol car paint, for the base colour, over their Plastic Primer. Remaining painting was using enamels from Humbrol and Precision Paints. |
 |
| Overall This is a relatively simple body kit, although the chassis modifications might not be for the faint hearted, resulting in a nice model, with a little care. The cast components were on the whole clean although suffered from slight pitting in some places (especially the smoke box door, and fitted together well. The A4 instruction sheet included brief historical notes (which is an improvement over the previous kits I have built) mainly concentrated on the chassis modifications with only a single paragraph dedicated to the body itself. A second sheet includes a parts list, hand drawn exploded diagrams of the both the body and chassis components. Also included is a copy (not to scale) of the official SR weight diagram for the class. |
 |
| General cast resin notes Cast resin is by nature quite a soft medium and files/drills quickly and easily with very little effort. I would suggest avoiding self tapping screws and ensure that you use the correct tapping drill for the thread form that you require otherwise threads can be easily stripped. Also avoid over tightening screws. Prior to painting clean the resin body thoroughly and I then suggest the use
of a plastic primer. I use an aerosol version from Halfords. |
all photographs are copyright Graham R 'Muz' Muspratt
return to model railway product reviews index
This page was created 3 July 2007
![]()