Phoenix Coach Kits
| Phoenix Coach Kits - Review 4mm Scale Bulleid Coaches (with a hint of Bachmann, Southern Pride and Ian Kirk/Colin Ashby) Text and pictures by Graham 'Muz'. The first corridor sets to be constructed to Bulleid's
new wide-bodied design was an order placed in 1940 and which was delayed by the
war, but a start on them was allowed in late 1944. The body length at 59ft was
the same as Maunsell stock and employed some surplus Maunsell underframes and
the body sides were the similar continuous curve profile as used on the new
4SUBs with each compartment still retaining individual doors. Introduced in
1946 were 64ft length coaches, which after the initial batch of four 3-caoch
sets saw a new design layout with compartments no longer having individual
doors, access being via the corridors. |
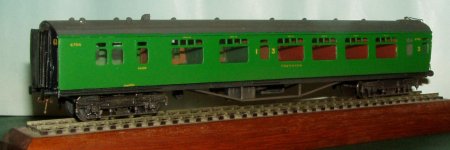 |
| BCK 6700 from Set 63 |
| The Phoenix range of Southern coach kits available from
the
Southern Railways Group covers examples of the SR built Bulleid coaches.
The products also include Ironclad, Maunsell, Post Office, SECR and Multiple
Units.
So far, from Phoenix kits, I have built the following
(Phoenix reference number in brackets) I model the period from 1946 to 1949 so
all are finished in malachite green livery. Also currently on the workbench is a complete Bournemouth 6
Coach Set No 290, pictures of which will follow once complete. |
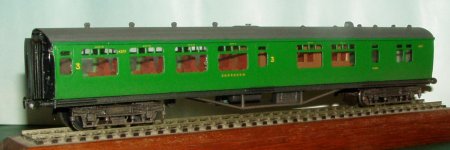 |
| SOB 4371 from Set 63 |
| The kits:
Each coach body kit contains: Bogies / wheels are not included with the kits and I choose to use the Phoenix "Adjustaride" Southern 8ft (SAB1) bogies which are easy to assemble, have adjustable sprung bolster, and come complete with side plates, rubbing plates and bearings etc. I have found these to give great running qualities (I also have fitted them to one of my Southern Pride rake of Bulleids as well). Rigid bogies are also available from Phoenix or Roxey Mouldings and the Bachmann Southern 8ft Bogies as fitted to their Bulleid coaches could also be used. Assembly: I deviated from the supplied instructions which recommends making sides ends and roof as one assembly and the floor and under frame as another, instead I fixed the ends, followed by the sides to the under frame leaving the roof to be fitted later. This is purely a matter of personal preference. I chose to use either two-part epoxy resin for the main assembly and Cyanoacrylate (superglue) for some of the smaller items, other than for fixing the roof where I use a very small amount of contact adhesive, such as Evostick®, at each end as this enables the roof to be reasonably easily removed at a later date if required. Body / under frame: The pre-punched aluminium side are pre-formed with the correct tumblehome - as mine were older versions of the kits the door outlines needed to be scribed before assembly. The current Phoenix range is supplied with pre-scribed sides. Extreme care needs to be taken when doing this as it very easy for the scriber to slip. The depth of the scribed lines needs to be judged so that it will still be visible once the paint has been applied. It is worthwhile making a simple stencil from a small sheet of brass to make this job easier. It is recommended to lightly finish the aluminium sides with fine emery or wire wool to provide a key for the paint and adhesive. The white metal castings supplied were very crisp and required little or no cleaning up. I fitted the sole bars to the floor pan and then as stated above fitted ends followed by sides to form the main box of the body. Once the under frame detail was fitted I degreased and aerosol spray-painted throughout, using primer from HalfordsTM and malachite green topcoat from Precision Paints. Very light weathering was airbrushed mainly to the bogies and under frame allowing a slight amount of spray to creep up from the bottom of the sides. HMRS Pressfix decals were used including the tiny seat number information positioned above the windows and then the sides were satin varnished prior to glazing. I used the plastic glazing material supplied with the kit and carefully fixed this from the rear. With the aluminium sides being quite thin, although not flush the effect is more than acceptable. Soft plastic corridor connectors were fitted, I have a stock of these made, I think, a few years ago by Cavendish that I picked up from an exhibition somewhere. I will one day perhaps get round to fitting the door handles from a Southern Pride etched fret. I have fitted Kadee®Nº5 buckeye couplings screwed to the underside of the floor behind the buffer beams (rather than to the bogies as I feel this is to un-prototypical), hooks and screw couplings are fitted in place of the Kadees® to the outer ends of each set. Very light weathering was airbrushed mainly to the under frame allowing a slight amount of spray to creep up from the bottom of the sides. |
 |
| Loose TK s1932 |
| Interiors:
Supplied with the kits are, where applicable, pre-punched plasticard partitions. I assembled the interiors on a false plasticard floor using the supplied scale plans as a guide, and used seating from either Ratio or Southern Pride. These were then suitably painted matt brown for the partitions, pinkish red for the third class seats and a dark green for the first class seats. Roof: The scale plans included with the kits easily enable the
roof ventilator positions to be correctly located, holes drilled and the
supplied castings glued into the aluminium roof section. Water tanks were added
using the injection moulded tanks supplied by Southern Pride rather then the
aluminium ones supplied by Phoenix. Rainwater strips were represented using the
fine lining tape also available from Phoenix. Following priming with aerosol
primer I then brush painted the topcoat grey to give the effect of the
stretched canvas. Bogies: The Phoenix "Adjustaride" bogies comprise of etched brass truck with white metal side frames and fittings. The bolster is sprung and adjustable to gain the correct ride height for the body once fitted. Assembly is simple following the clear instructions supplied. I fitted Romford wheels. |
All photographs are copyright Graham R 'Muz' Muspratt
First | 2nd
This page was last updated 28 June 2004
![]()