| Method - new cab I make new cab sides and roof as one piece from 18-thou brass. I use a template as per the diagram below to give me the developed shape (i.e. allowance made curves). 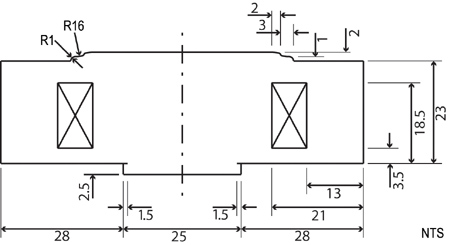 This template also gives the correct location for the window openings for the etched brass window surrounds (Jackson Evans) and uses the cab floor as the datum point. I use drilled holes then a fine piercing saw followed by needle files to create the desired shape and apertures in the brass sheet. For my first attempt I got the developed length of the roof slightly too long and had to cut the cab into two halves across the centre of the roof, filed each edge slightly and soldered back together with a butt joint. The new cab roof shutter hides some of the joint. One alternative would be to make the cab in two halves to start with, allowing a slight overlap across the top of the roof for adjustment prior to making a tight butt joint. 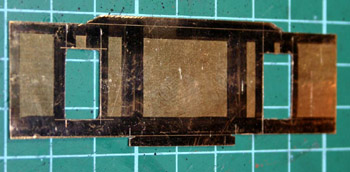 The new sides need to be curved to the correct profile and then a tighter curve blending into the cab roof. It is worth taking time to do this. I obtained the curves by bending around suitable diameters of metal bars. I use the profile of the tender side / rear spectacle plate as a match for the cab sides and followed the curve of the original Hornby® cab for the side to roof transition curve and roof profile itself. This is to ensure that the roof height correctly matches the to the top of the boiler casing. The Jackson Evans window frames are then soldered into place with the rain strip over the window opening. The rear window is a separate etching allowing it to be in the open position, noting that the rear widow pane slides behind the front one. I glued the rear panes in place after I had finished, painted the model and glazed the front windows. Once the new cab is glued into place, I fitted a white metal cab roof shutter (Westward) and representations of the cab lifting bales bent into the correct shape from 5-thou 1/32" brass strip. The ends of the rear cab overhang are bent downwards slightly as per the prototype. The front of the cab is then formed using Milliput® filler creating the bottom edge of the front window at the same time. As the gap between the boiler casing and cab side is so small this is not as daunting as it might sound. A small amount of Milliput® on a slightly damp scalpel blade, at 90 deg to the front, pushed into the gap and then the blade wiped towards the side is enough to both form and finish the cab front in one go, leaving only a slight adjustment to be made to form the bottom edge of the window, which I carefully do with a fine needle file once the Milliput® has slightly hardened. 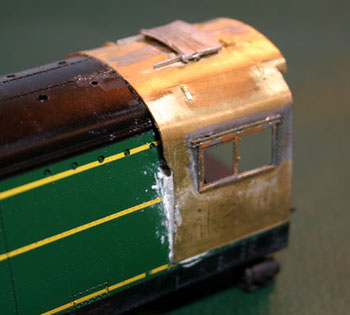 The original rear spectacle plates are glued into place and any slight gap between them and the new cab side filled with Milliput®. As these are painted clear plastic the actual window area will need to be masked prior to repainting the model Painting and finishing So far I have modelled: 
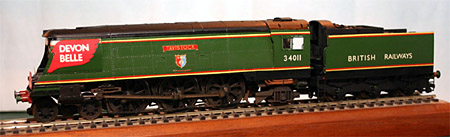
Next on to the workbench will be: 21C102 "Salisbury" with short deflectors and original cab. I have a Hornby® R2219 Blackmore Vale lined up for this conversion, as this is the only Hornby® version to date with the short deflectors. I have already modified it to remove speedometer and therefore replaced the rear axle (a member of the SREmG list happened to want to add a speedometer to a later BR version so we did a simple swap). I will have to modify the body slightly as the safety valves are in the later (correct as preserved) 2-off rear position rather than the original forward location with 3 valves. Markits produce the correct pattern 3-off valves that I shall use. For a table on the Hornby® variants click here Possible alternative method |
This page was updated 24 July 2005
all photographs are copyright Graham R 'Muz' Muspratt.
![]()