Modelling Notes:
Converting a Bachmann N Class into a N1 Class
by Graham R 'Muz' Muspratt
For information on the prototype please visit our N1 Class section. |
| The Maunsell N1 class, comprising of six engines, was a 3
cylinder version of the N class with the most notable differences being the
straight running plate in front of the cylinders, the extended vertical face
above the front buffer beam and shallower smoke deflectors. The less obvious
difference are the front cab windows where the N1 class has a single curved
window on each side of the boiler whereas the N class has a smaller main curved
window and a second small circular window above the firebox on each side. Also
what I think are lubrication oil reservoirs are located on each side of the
running plate just behind the smoke deflectors. Present photographs are of the model before final painting - once painted new ones will be posted to the page. Note that the N1 class were fitted with the 3500/4000 gallon straight sided tender and not the sloping sided 4000 gallon tender as per the later (3)14xx N Class. Differences on the chassis between N1 Class and N Class:
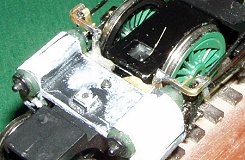
Chassis modifications: The front mouldings for the valve chest were then re-affixed. The rear valve chest mouldings were re-affixed once the brackets to support the pivot of the radius bar and combination lever were removed. Before re-assembling the valve gear I simply re-drilled the piston rod hole in each cylinder to ensure that no Milliput® impeded the movement of the rod. Combination Lever Support bracket - The vertical part of the bracket was made with a 'U' shape piece of 10 thou brass, soldered to the rest of the bracket. The rear of this was drilled to accept the pivot pin on the back of the combination lever. Valve Rod - 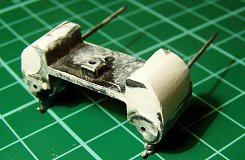
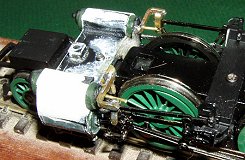
Body modifications: Once the chassis was removed I carefully removed the two smoke deflectors. They are fixed via three small lugs and should be pushed upwards from underneath the running plate. As I was modelling the locomotive in 1946 condition I also removed and discarded the AWS box and cylinder mounted on the running plate just in front of the cab. I removed the boiler and cab assembly by removing the one screw located underneath the middle of the boiler and the one underneath the cab (with the chassis removed the screw at the smoke box end has already been removed). The cab itself was then removed by sliding it upwards from the boiler Front running plate and buffer beam - The DJH (or your own from brass sheet) running plate vertical front and buffer beam overlay was soldered together and a backing piece of 30 thou. brass filed to shape to match the top edge of the overlay and the top edge of the buffer beam on the running plate. This was then glued to the Bachmann running / buffer beam assembly. The centre drop down section of the running plate in front of the smoke box was raised to match the profile of new front buffer beam assembly using two rectangles of 30 thou. brass, shaped to fit, as the width narrows after the point where the original running remains and soldered back to back and glued into place. The underside of the smoke box was filed flat slightly to allow the filler plate to fit underneath. I then made the replacement running plate for the gap left following the removal of the curved section using 20 thou. brass; this overlaps the central dropdown section slightly. This was made to be as close a fit as possible and then soldered to the running plate and the new buffer beam to give an invisible joint (in fact the joint with the running plate is virtually hidden on the top by the smoke deflectors). The outer edge was filed at 45 degrees to thin the edge representing the lip on the edge of the running plate. A piece of 30 thou. brass was soldered underneath to give the full thickness of the running plate. Finally the side edge of the running plate was soldered into place using 20 thou. x 30 thou. brass flat and filed to size to match the Bachmann running plate Brass sprung buffers (Alan Gibson) cast white metal steam heat and vacuum pipes, lamp irons (cut down Bambi® staples) and small grab handles (0.5mm brass wire) were fitted to the buffer beam. Front steps - Smoke deflectors - 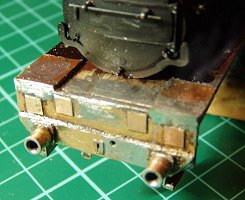

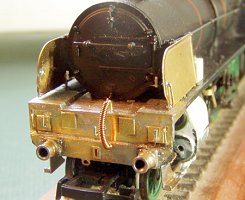
Cab - Thanks, yet again, to DJH I had a couple of spare etched brass N1 window surrounds which I glued into the correct position and then filed the window apertures to suit (A new window surround could be made either with a bead of fine plastic from heated and drawn-out plastic sprue or fine brass wire and then the front edge lightly filed flat). New glazing from 10 thou clear plasticard was cut and filed to shape to fit the window aperture to give a flush effect. This was glued into position using a small amount of PVA round the glazing edge, as this dries clear, 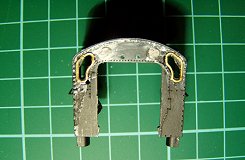 Lubricating Oil reservoirs - Tender: Removal of Bachmann printing: |
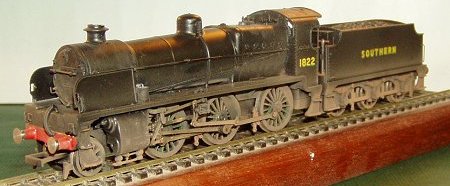 |
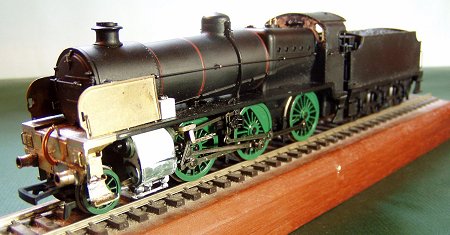
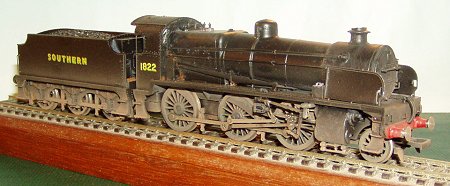
| The finished model, painted in post war Southern Railway black livery and nicely weathered. |
 |
all photographs are copyright Graham R 'Muz' Muspratt.
return to proprietary and kit "model bashing" page
This page was last updated 8 February 2004
![]()